
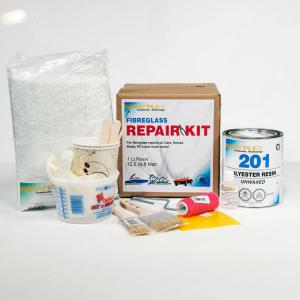
Fiberglass Repair Kit Quart

1L Kit Includes:
- 1L of Resin
- 14ml Catalyst
- 12.5 sq ft of 1.5oz fiberglass matt folded and wrapped in plastic for shipping
- 2" chip brush (1)
- 1" chip brush (1)
- 3" roller (1)
- 4" plastic spreader (1)
- 16oz mixing container (1)
- 8oz paper cups (2)
- 6" mixing sticks (2)
- Latex gloves (2 pair)
- Instruction Sheet
Rayplex® Repair Overview:
Fiberglass is an adamant material, but it may develop cracks or holes under rough conditions or if faced with an accident. There are several methods for repairing it, but using our Rayplex® Fiberglass Resin will be your easiest solution. Our resin is the same high-strength polyester resin that is used to build most boats. It can be used alone or with fiberglass tape, cloth or mat to repair damaged fiberglass boats, snowmobiles, jet skis and even household items such as bathtubs and showers. This product can also be used as a sealer on damaged and rotted wood. It is great on rusted-out metal and can join most surfaces together while creating a strong and long lasting bond. It cures in 2 hours, resulting in a non-shrinking and durable repair. It is also compatible with all paints and gelcoats and comes with our Rayplex® Liquid Hardener.
This basic step by step guide will walk you thru the considerations needed for structural repairs.
Step 1: Evaluate the damage
- What is the severity of the damage; tear, hole or puncture etc.
- Outline the boundary of the damage with a contrasting maker and take note of the problem area as it may extend further then what can be seen visually.
- What is needed to do the repair, evaluate if it's even worth the repair or cheaper to buy new.
Step 2: Preparing the area
- Realign, remove, bang out or sand the damaged area and offer support where needed.
- Clean the area to be repaired with soap and water or Acetone to remove water soluble contaminants.
Step 3: Cut your materials
- Pre-cut your patch materials (fiberglass mat or cloth) to fit the repair. Ensure to extend 2-3 inches beyond the edge of the damaged area.
Step 4: Mix your resin
- Measure your patch materials as you should target a 50:50 fiber to resin ratio for your repair as this should completely saturate your mat or cloth.
- Measure and pour the same weight of Rayplex® All Purpose Fiberglass Resin into a clean paper cup.
Note: DO NOT use a waxed cup.
- Add the catalyst or hardener.
Tip: 8 -10 drops of hardener per 1oz of resin or 1/4 teaspoon of hardener for 6 tbsp of resin.
Note: Visit us online at Rayplex.ca; Tech Tip page for a guide on "How much resin do I use?"
- Working time of mixed resin is approximately 8 to 12 minutes. So mix in small batches.
Note: The amount of time that it takes for resin to harden is controlled by 2 factors,
a) temperature and
b) the amount of catalyst (hardener)
Step 5: Applying the material to the repair site
- Start with brushing a coat of the resin-hardener mixture onto the damaged area, extending 2-3 inches beyond the repair.
- Next, lay your pre-cut cloth or mat over the damaged area. Using a paint brush, apply the resin-hardener mixture to the fiberglass material.
Note: a dabbing motion will help to saturate the fiberglass and remove any air pockets.
- Immediately place the second piece of fiberglass material over the damaged area, following the same procedure; may require more than 2 pieces of fiberglass depending upon the size of the damaged area and strength needed.
Note: If the surface has dried and is no longer sticky or wet, you will need to sand with 80 grit sandpaper prior to applying additional layers of
resin and fiberglass cloth or mat.
- Follow same instructions if both sides are being repaired.
- Allow the material to cure, approximately 2hrs at 75° F. Curing will take longer at colder temperatures.
Note: clean your paint brush or tools with acetone while the resin is still wet for easier clean up.
Step 6: Sand & Finish
- Once the area has fully cured, you are ready to sand the surface. Tip: 80 grit sandpaper suggested.
- Clean the area and apply a thin coat of body filler to fill pin holes where needed.
- To have that featheredge look; use 180 grit sandpaper to blend the edges for a final finish.
Structural Strength
When combined with Rayplex® Fiberglass Cloth, Mat and Roving, Rayplex® All Purpose Fiberglass Resin is an extremely strong and durable repair method. It can handle any repair ranging from the smallest to the largest of projects. When the resin and liquid hardener are mixed a reaction occurs which allows the resin to chemically bond to the surface you are repairing. This technological advantage of a 2-part system allows the product to fully cure in 2 hours and adhere permanently to the repaired surface. Not only can you save money but you can make professional, great looking repairs.
First Aid Measures
Skin Contact: wash with soap and water
Eye Contact: Flush with flowing water for 15 min. If irritation persists, obtain medical attention.
Ingestion: DO NOT induce vomiting. If swallowed contact physician or poison control centre immediately.
Inhalation: Remove victim to fresh air. Give oxygen or artificial respiration as required. Obtain medical attention.
How much resin do I need?
Visit our website at the following link to help guide you.
https://www.rayplex.ca/resin-estimator.html
Want more information on the basics of fiberglass?
Watch Ray on YouTube teaching you about basic fiberglass repair.
Learning the Basics of Fibreglass Laminating Video - YouTube
https://www.youtube.com/watch?v=iFaA6wbZ4ac
Featured positive reviews:
great product. Instructions very clear. I was not expecting to have a strong smell thou so I recommend using it outside or if you have a detached garage, use it there. Mine is attached to my home so yep, it stinks a lot but despite the smell, the product is great, and the price is reasonable.